Monday, April 23, 2012

Seasons Challenge in Machine Quilting Unlimited Magazine


The current issue (May-June) of Machine Quilting Unlimited magazine reveals their Seasons Challenge and I am one of the lucky invitees who participated in it.  There are 12 quilt artists and each was assigned a different season (so three for each season).  I was given Spring and since I had to create the piece in the Fall and Winter this was definitely a challenge!

The pieces had to be 18"h x 24"w and that also was a challenge for me as I don't often use a landscape orientation.  It was a little bit difficult to be inspired for a piece where the theme and size were inspired by someone else's idea of what the piece should be.  I work very intuitively and things just come together as I go along.  I am inspired by a fabric, a color scheme, or a technique and then I just create from there.  For this piece I made a list of everything I could think of that was Spring and looked at my fabric stash for inspiration.  Eventually I was able to sketch out an idea I thought would work using a piece of fabric I had painted with a watercolor-y landscape.   I then started cutting up fabric and putting it up on my design wall. Then the piece flowed together and I finished well before the deadline.


IN PROGRESS:  This shows my fabrics up on the design wall before being stitched down.  I use a glue stick to adhere the pieces.
Here are some more images of my piece which is entitled:  "The Story of Spring:  From Thaw to Bloom".  It chronicles the process that we experience every Spring here in Montana where the ground begins to thaw, rain feeds the earth, and things begin to grow.  The beading down the curvy center strip was done to try to portray that transition from the thawing snow and ice---melting, dripping---to the watery, muddy ground that soon is dotted with new shoots of growth and eventually bloom.  I am very happy with the color in my piece as I think it reflects the transition from the spareness of winter into the softness of spring and then hinting at the intensity of summer to come.  I hope it portrays what I was thinking about spring as a transitional season, and yet certainly beautiful in its own right.

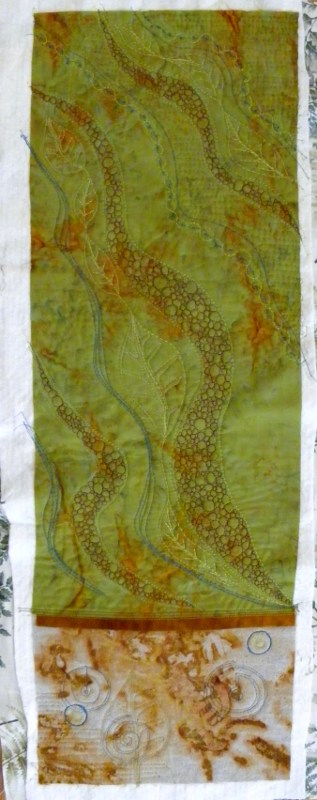
This is the finished piece.  I used a double flat piping border inside the binding.  


Detail image of the stitching and beading in the blooming spring landscape.


The beading at the top is more reflective of melting snow and ice.  As it moves towards the bottom of the piece the beads are more earthy and "muddy".


Detail of the stitching and beading in the spring sky.

On the left side of the piece are the earthy early blooming tulips and foliage that signify we have left winter behind.  On the right side is the landscape that is transforming from muddy earth and yellow grasses to a greening, blooming, landscape---coloring up and coming alive.   Water falling and accumulating in pools and blue skies with clouds blowing through on summer breezes are part of the process that we call Spring.


I have done a number of challenges and always do find them challenging because of the way I usually work. Whether the challenge begins with a certain fabric you have to use or a theme, the challenge for me is to make something that is reflective of my own style and blends the rules of the challenge with my own inspiration to create a successful piece.  That is not to say that I don't enjoy doing them and sometimes I do end up with successful pieces--and sometimes not so much!  I was, however, happy with how this piece turned out and I'm proud to have it included in this impressive line-up of art from some well-respected artists.  It was great fun to create the piece and not it is great fun seeing it in the magazine and knowing it is going to travel to quilt shows across the country in this impressive grouping.  Here are the other artists who are in the challenge:  Spring:  Sue Reno, Patty Hawkins  Summer:  Patricia Anderson Turner, Eileen Doughty, Roxane Lessa  Fall:  Judy Momenzadeh, Carol Ann Sinnreich, Lea McComas  Winter:  Patt Blair, Kate Themel, Kathie Briggs.


MQU magazine is one of my favorite magazines and well worth the cost of a subscription.   If you do your own quilting and particularly if you find that an important part of your art/quilts, then this is the magazine for you.  It covers domestic, mid-arm and long-arm quilting.  It is not available on all newstands, but you can find it at Barnes & Noble and Joann's (although I have not seen it yet at my local Joann's store.)  You can subscribe here:  http://mqumag.com/store

P.S. -  This is my 100th Blog Post!!  Yea......clap, clap, clap!!!


Wednesday, April 18, 2012

Whooooo Houses

Recently I wanted to make some kind of small project that could be priced to sell for the fiber show that opened this month here in Stevensville at River's Mist Gallery. I came across three small clay owls that I had purchased some time ago and decided to make them some homes. Following is what I came up with.

Because I only had three of the clay owls, in order to make more houses I had to substitute fabric owls and some smaller glass owls that I found. I took pictures of the entire process so I could attempt to write up a magazine article about making them and submit it somewhere.

This is one of the original clay owls which is less than an inch tall:

Here are materials I gathered for making the trees:

Here I have used a glue stick to adhere various fabrics to a piece of batting. Then I stitch them on, add a backing, cut the hole, trim the hole with yarn, add the little animal, and shape the flat piece into a tree trunk.


This is still in progress but you can see it shaping up into a 3-dimensional tree trunk. I don't have it sewn to the base (Timtex) yet or embellished.


The one on the left has a pinecone added as embellishment for the base:

I have sold 4 of the brown trees so far (one with a glass owl). I also made some more colorful trees that have fabric owls in the hole and one that has a bear's face looking out of the hole and some bees around it---and honey dripping down from the top of the trunk.

There is a little fabric bunny on the back of this one for an added touch of whimsy:

I am working on some more and looking for a source for the little clay owls. Someone gave me a bead website that might have them so I'll check there. The clay owls are the ones that sold first and the owls are very well done and hang nicely in the hole. They have a hole right through their head so they swing on a little piece of rattail cord.

This is a very fun small project that uses a little bit of free motion quilting, couching, and hand stitching. They take a bit of time with all the steps involved, but they are so cute I think it is worth it. I'm going to make some more even if I don't find the clay owls.

Back to work...!

Monday, April 9, 2012

Solo Show Rescheduled

I just rescheduled my May solo show in Missoula, Montana to September of this year. That gives me time to create more new and innovative work for that show and hopefully have a cohesive collection of all new work.   I will also now have time to try to create a piece or two for a science and art show sponsored by Rocky Mountain Laboratories in Hamilton, Montana, where my husband works.  My son is working on a painting for this show.  

The piece in my previous post, which is now titled "Chain Reaction", is now hanging in the Sophisticated Fiber show at River's Mist Gallery in Stevensville, Montana.  This show opened last Friday and is very beautiful.  If you live in this area it is worth stopping by to see the variety of fiber included in the show and how beautifully Gretchen Spiess (owner of the gallery) has displayed it.  


Monday, April 2, 2012

New Work for May Solo Show

Started on a new piece this week which will be for my next show in May. I like the color and quilting on this piece, but maybe I overdid it with the embellishment? I used a facing to turn the edges to the back and I like the effect, but it doesn't hang as flat as I would like. Will have to steam it a bit and see if that helps.

Here are the fabrics: a rusty gold cotton, a lime green/rust batik, and an Osnaburg that I rusted.


Lots of quilting, not sure how well you can see it in these pictures but it turned out nicely.

Embellished with a loopy yarn edging inserted in the facing, silk flowers centered with stone donut beads, and some additional beads for accent. Not sure what the brown beads are made of, but guessing maybe bone or horn colored to look like wood. The ones at the bottom are glass.


Love the rusted Osnaburg. Many people don't seem to know what Osnaburg is but it is a great fabric in quilts. It is similar to a muslin but a coarser weave and texture and a nice organic feel to it. I love to use it in many different ways. My sister and I split the large rusted piece we had put into a big garbage bag with a rusty old tow chain. Created some great rust coloring, but boy does that needle clunk when you hit the heavily rusted spots!

Working on a title for this one....

The Challenges and Triumphs of 2022

One thing I can say about 2022 is that it was not a dull year! We have all been enjoying a little more freedom and social interaction with l...